
Homemade Spanish Croquettes
It’s a bold statement when a nation feels so strongly about a food, that they establish an international day to celebrate it. You think I’m joking, but Spain has established January 16th as International Croquette Day.
However, an internet search reveals that no other country seems to be celebrating with them. Perhaps the rest of the world will catch on next year…
Long before this momentous day arrived, the Spanish croquette was already a staple of everyday cuisine. Examples run the gamut from greasy bricks of bar food, to delicate balls of bechamel, lightly battered in bread crumbs. Regardless of quality, one inevitably overhears, “These are good, but my mother’s are better.”
In defense of my own mother-in-law’s croquettes – the now famous Fresita – I decided to write up her recipe here to share with all of you, dear readers.
But first, a bit of background…
A Short History of the Croquette
Though wildly popular in Spain throughout the last century, the croquette is in fact a French creation. The word stems from the French verb croquer, to be crunchy. Crunchy only on the outside of course, as the silky interior is dominated by bechamel, one of the five French mother sauces.
The flour, butter and milk recipe for bechamel was invented in France in the mid 1600’s, named after the Marquis de Béchamel, steward of Louis XIV of France. Bechamel sauce would eventually make its way to Spain via the restaurant Lhardy, a Madrid institution still open to the public, dating back to 1839.
In times when food was scarcer and leftovers were prized, the humble croquette made the most out of uneaten scraps. Bechamel, or its stock-infused equivalent Veloute sauce, was the perfect medium to bind together these scraps, extending their lifespan while beefing up their calories.
When my wife was a child, the croquette served another useful purpose, Fresita reminded me. Picky daughters could be tricked into eating fish if it came shredded and folded into a silky soft croquette…
Not that you need such an excuse to knock out a few dozen of these as appetizers.
One of the great things about croquettes, is that while the ingredients are simple, the possible flavor combinations are endless. Therefore, you probably already have everything you need with just a quick peek into the fridge and the pantry.
Croquettes made with fish, meat, mushrooms, cheese, and spinach are all commonly found on menus across Spain. More exotic options include sauteed foie, blood sausage, saffron, squid ink, and even chocolate.
Although maybe it’s best to stick to chicken for this first time out…
Fresita’s Recipe for Homemade Chicken Croquettes
Adapted from Fresita’s non-existing recipe book. Serves 4 - 6 as an appetizer.
As readers of previous Fresita posts already know, there is no fixed recipe by which my mother-in-law cooks. So I’ve done my best here to translate her on-the-fly measurements and methods.
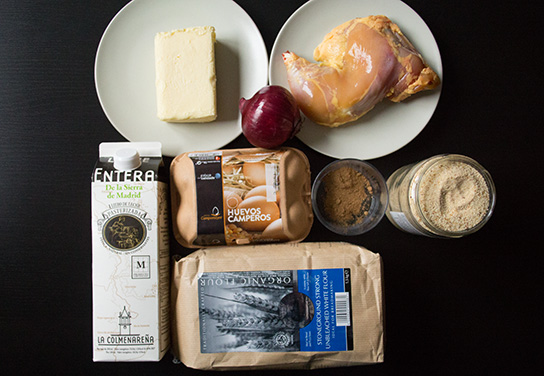
- One cooked chicken thigh without skin (Fresita likes to first make a chicken broth by simmering the thigh along with some carrots, onions, and celery. She’ll then use the thigh for the croquette filling).
- 80g of butter
- 80g of white flour
- 1 liter (4.25 cups) of whole milk (best if close to room temperature)
- 1/2 small red onion, shredded with a cheese grater
- 2 eggs
- bread crumbs
- 1/8th teaspoon of nutmeg
- salt to taste
1) Using a pair of scissors, cut up the chicken thigh into tiny bite-sized pieces.
2) Melt the butter in a deep pan, and add the shredded red onion. Saute on medium heat for 5 minutes.
3) Add the cut up chicken thigh to the pan, and stir around for just a few minutes.
4) Add the flour and stir on medium-low heat for around 10 minutes. As you add the flour, it’s very important not to have the pan too hot, as you need enough time to cook the flour and make the roux. A hot pan can burn the flour and dry out the chicken.
- Steps #3 and #4 go against conventional wisdom a bit. Normally, the roux (the result of flour being stirred into melted butter) would be created first, in order to act as a thickening agent for the milk, which is added afterwards. This mixture then becomes bechamel sauce once the milk has been absorbed. Only then, after the sauce is finished, would the chicken normally be added. However, Fresita likes to add the chicken before the flour, so that the meat absorbs more of the onion-sauteed-in-butter flavor. She admitted that this was a personal preference, and told me to try both ways and compare. If this is your first time making bechamel, it’s easier to make the roux, and then add the milk to make the bechamel before finally adding the chicken.
5) Remove the pan from the stove and add half of the milk, which should be closer to room temperature than not. Slowly stir the milk for two minutes, and then place the pan back on the stove on medium heat.
6) Continue to stir until you see the sauce thickening. Add the nutmeg, salt to taste, and the rest of the milk. Continue to stir. If your sauce starts to simmer, lower the temperature by half and continue stirring until you have a consistency that is similar to the vertical photo shown above, where Fresita is using a wooden spoon to scrape the finished bechamel on to a plate. It should roughly have the consistency of cooked oatmeal. Taste one last time for salt. Then pour the sauce on to a plate and let cool for 30 minutes before placing in the fridge for two hours to allow the sauce to thicken.
- Finding the perfect consistency for the sauce is part trial and error. Bechamel that is too thick will be easy to form when it cools, but results in a brick of a croquette. Bechamel sauce that isn’t thick enough will be a nightmare to form into oval shapes and will fall apart later when you fry it.
7) As you’re waiting for the sauce to thicken, beat two eggs in a bowl, and sprinkle a healthy amount of breadcrumbs on to a plate (or aluminum foil).
8) Once the sauce has thickened, take the croquettes out of the fridge. Using a soup spoon, scoop out a wedge of croquette dough and roll it between your hands until it’s a roughly uniform oval shape. Now dip it in egg, and roll it lightly in breadcrumbs. If your sauce is still not thick enough to shape the croquette, there’s a back up plan. Cover the plate in tin foil and place in the freezer for an hour. This should be just enough time for it to thicken without freezing.
9) In a small pan, add enough of your chosen cooking oil so that the croquettes will be half-way immersed when you place them in the pan. Heat the oil on medium high. You’ll know the oil is ready when you can dip the tip of the croquette in the oil and start to hear and see the sizzle.
- When choosing an oil to fry with, getting the right smoke point is important. While Fresita prefers frying at slightly lower temperatures and using Extra Virgin Olive Oil, the majority of home cooks in Spain feel that higher temps with refined olive oil works best. While refined oil does have a higher smoke point, the resulting taste is another matter.
10) Add around 5 croquettes one by one to the oil, making sure that the oil continues to sizzle with the addition of each croquette. Otherwise, the croquettes will start to soak up the oil rather than browning.
11) Fry the bottom side of the croquette until it’s light brown. Flip the croquette and repeat. Transfer to a paper towel-lined plate to soak up any oil drippings. Serve while still warm.
*For more of a broth-flavored croquette, substitute half the milk for chicken or beef stock.
______________________________________________________________
When you visit Madrid’s bars, know that most croquettes are average at best. Therefore, it’s best to save your sampling for the following locations:
- El Triciclo
- Bar Melo’s
- La Carmencita
- Casa Labra
- La Gastrocroqueteria de Chema
- Croquette Stand at Mercado San Miguel - These croquettes can be excellent if you’re lucky enough to get them just after they’re fried (you’ll see a waiter arriving with tray in hand). Unfortunately, that’s usually not the case, and the cold examples sitting under the bright light will be microwaved in front of your eyes.
______________________________________________________________
Looking for things to do in Madrid? Get to know the city more in depth with a Historic Madrid Walking Tour, Gastronomic Madrid Tapas Tour, Madrid Wine Tasting, or take a wine tour of the Ribera del Duero region.
Last update: February 22, 2016
Share


KEEP UP WITH US


About us
Recent Posts
- Visiting the Luis Cañas winery in Rioja
- 12 Hours in Madrid with Rick Steves
- Remírez de Ganuza Rioja Reserva
- The Best Cheese Shop in Madrid
- Homemade Spanish Croquettes
- Faustino I Rioja Gran Reserva
- Motteau Artisan Pastries
- The Best Espadrilles in Madrid
- Javier Sanz Verdejo Malcorta
- Mistura Homemade Ice Cream
Categories
- Artisan Spanish Food
- Contemporary Shops
- Cooking with Fresita
- Expat Interviews
- Food and Drink
- Galicia
- Life in Madrid
- Madrid Cafes
- Madrid Restaurants
- Monuments
- Places
- Recipes
- Rick Steves in Madrid
- Spain
- Spanish Coffee
- Spanish Craft Beer
- Spanish Islands
- Spanish Wine
- Spanish Winery Visits
- Sweet Tooth Madrid
- Traditional Shops
- Wine Reviews